Tuesday, 31 May 2011

May Moodboard - And the winner is...

We've had an amazing response to May's green moodboard with a record 17 pieces submitted! Thank you so much to everyone who has joined in with us this month and also to all our readers and followers - we couldn't do it without you. Before I show you a round up of all the beautiful beadwork let's have a recap of the mosaic I posted at the beginning of the month...

Top row: green, Ghost Song, my lips are sealed
Middle row: Lime green wall, Pannonian sea, Green on Green
Bottom row: Crests Of Waves, Green Eyes, Green door against green grass


Debbie


Dee


Mandy


Carol


Liz (me)


Eleanor


Gemma


Elisabeth (adapted from a design by Kerrie Slade)


Didy


Kitty Ballistic


Catherine


Sarah


June


Again I'm using Random.org to randomly choose a name from the list and the beader who is in 1st position is...


Congratulations Didy!!! I'll be in touch shortly about your prize.

Well I hope you've all enjoyed this months challenge, don't forget to drop by again tomorrow when I'll be posting the brand new moodboard for June!

Saturday, 28 May 2011

Basic Stitch Tutorial - Herringbone Stitch

Last week we showed you how to make a strip of ladder stitch and this week we'll be using that strip as a starting base for herringbone. Herringbone stitch is one of my top three stitches and very easy to do once you learn the technique. I remember the first time I tried this stitch, I was amazed at how the beads lean toward each other so neatly to look almost like knitted stocking stitch.

First of all you need your ladder stitch base which for the purposes of this tutorial should be an even number of columns. I'm starting with a base of 8 columns, 2 beads high. You can start from a single row of beads but the double row is much easier to hold on to when you begin stitching.

With the thread coming out of a bead at the end of the row, pick up 2 beads and sew down through the adjacent bead...


Then sew back up through the next bead...


Pick up 2 more beads and sew down through the next bead, then back up through the next...


Continue in this way until you reach the end of the row. You'll see that the thread ends in the wrong place for starting a new row so you need to make a little maneouver to get the thread into the correct position.

Sew up through the adjacent bead...


and then sew up through the last bead you added...


Continue as before, adding your pairs of beads to the pairs in the previous row and making the turn at the end of each row...


When you've finished your strip of herringbone you'll want to finish off the end so that the beads are joined together rather than separated into pairs. The thread path is exactly the same as ladder stitch.

Sew down through the second bead...


and up through the third...


Sew back down through the second bead again...


and back up through the third...


Continue in this way, stitching each bead to it's neighbours. Finish off by weaving both your threads into the beadwork and trim.


Or rather than trim them, you may want to use the threads to attach a button and loop to make a bracelet as I've done here. For this one I've used hex beads.


And here I've used a blue and green mix of size 11s and attached the strip of herringbone to an aluminium cuff that I first covered with Ultrasuede. A perfect base for this huge button!


Well I hope you've enjoyed this tutorial. There's so much things you can do with this stitch so I hope you'll continue to explore it and wish you many adventures in herringbone!

Wednesday, 25 May 2011

Pattern Finds - Mad Rings 2 by Heather Collin and a Treat!

Happy Wednesday!

I'm excited to introduce a new feature to OTTBS, Pattern Finds. I love to search the web to find unusual beadwork patterns and tutorials from indie designers and thought that it would be fun to share them here with the hopes that it will inspire us all to try new designs and techniques, use up our bead stash and also promote the designers.

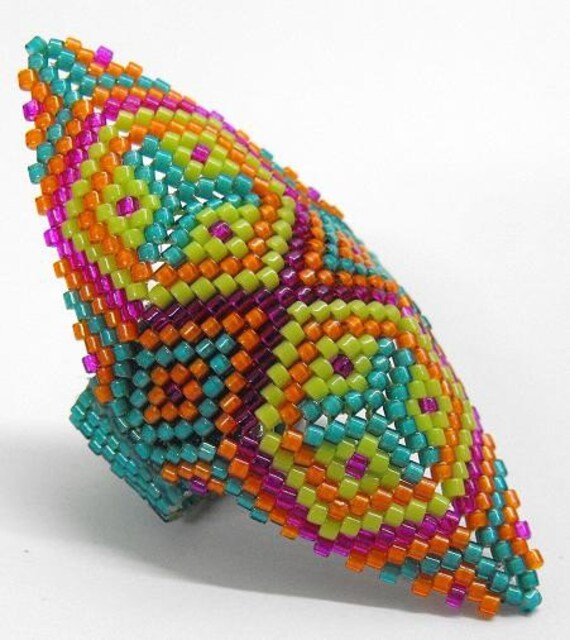
We are kicking the new feature off with a real treat from Heather Collin of Beading Patterns by Heather. The Mad Rings 2 pattern really drew my eye when I was browsing on Etsy! The beautiful, bright colours are bold and modern, the design is intricate and it's one heck of a statement ring! How could I not love it at first sight?

As a special treat for OTTBS readers Heather is offering a discount of 50% on the Mad Rings 2 Pattern! The discount code is TTBS2, thank you so much to Heather for making the 1st Pattern Finds extra special with her generosity!


Isn't it beautiful? Please go visit Heather's shop and have a look at all her beautiful patterns, but please remember that the discount code applies only to the Mad Rings 2 design and not any other patterns in the shop.

I will be starting my ring tonight! I recently bought some peacock style colours of delica's and have been looking for the right pattern for them, I think this will be perfect! There are 5 pages in the pattern which includes 2 designs. The pattern has full colour photograph, diagrams and graphs, step by step instructions and even blank graphs for you to chart your own design! The instructions are very clear and easy to read, though I must say that the diagrams are very good and I will probably go mostly by them.

I'm off to go start my ring! Thank you again to Heather for her generosity!

Update: I have just completed the 1st part of the basic design ring top and have to say how impressed I am! It is a well thought out pattern making the beading actually much easier than it looks and Heather has employed a very clever trick involving coloured headings so that once you have the 1st couple of rows started you just need to look at the colour of the header to see what colour is next. I can't wait to finish this one and move on to the more intricate pattern version!

Happy Beading!

Sarahx

Monday, 23 May 2011

May Moodboard

Our green moodboard has proved to be very popular and this week we have some more gorgeous beadwork to share with you!

Debbie made these wonderful lampwork beads...


Eleanor captured two cabochons with seed beads...


And Gemma created this beautiful hair barrette using firepolish crystals...


We're getting toward the end of the month but there's still plenty of time left to create something for the moodboard, click here for details on how to join in.

Saturday, 21 May 2011

Basic Stitch Tutorial - Ladder Stitch

Today's basic stitch tutorial is ladder stitch, which is a very useful technique to learn. Incredibly easy to do, it often forms the basis for many other stitches, including herringbone and brick stitch.

You can work ladder stitch using one or more beads, but for the purpose of this tutorial I'm making a strip that's two beads high (this is sometimes called a two bead stack). If you need to make a strip one bead high, simply pick up one bead at a time instead of two.

Thread your needle with a comfortable length of thread and pick up a stop bead. Leaving about an 8" tail, sew through the stop bead once or twice more being careful not to split the thread. The stop bead is optional but it will help to keep the beads positioned as you work.

Pick up 4 seed beads, slide them down to the stop bead and sew through the first 2 seed beads in the same direction...


Pull the thread snug, positioning the beads so that the two pairs sit side by side and sew back down through the second pair...


Pick up 2 more seed beads and sew down through the adjacent pair of beads...


Sew back up through the pair you just added...


Continue in this way, picking up 2 beads at a time until the strip is as wide as you need.


Don't forget to check back next week when I'll be using this ladder stitch strip as a base for herringbone :)

Wednesday, 18 May 2011

Wednesday Review - Starlet Earrings Pattern by Liz Reed

Ok beaders, To help out and give Sarah a bit of time to stop and take a breath, I decided to write a review for you all, and as I had only bought Liz's Starlet Earring pattern the other night, I couldn't wait to test it out and make some earrings so we thought it a good idea to review it too.

Now we all know what it's like to buy a PDF pattern, and sometimes wait (for what seems like an age) for it to arrive via email!
Well worry no longer! If you want to buy one of Liz's Patterns www.thecrimsonmoon.etsy.com rest assured it will be with you within a flash (that is assuming she lives by her pc like me hehehe)

Anyhow, let's get down to the nitty gritty of my opinion of the pattern.

First impressions?

Very clear, nice size font, so it's easy to read, beautiful quality pictures and lots of step by step photos so you can tell where your supposed to be each step of the way.
The pattern is only 2 pages long so nice to put back to back and laminate to keep it clean and to hand ;o)

I like Liz's tutorials as she obviously thinks them through before she starts, Liz uses different colours at each stage so we can tell which step we are on by looking at the correct 'figure No' pictures that corresponds to what step we are at.

I think that both beginner beaders and more advanced beaders will enjoy learning a new technique and find Liz's patterns very easy to follow. You can get the beads in the sizes required from anywhere, no fancy or unusual ones that you cannot find.

After all if I can follow them, anyone can! I normally try and make things by looking at the pictures given in the tutorial without reading the instructions first, then mess it up somewhere along the way and have to unpick read and restart hehehe!

All in all a very good tutorial, nice clear instructions and step by step photographs. Great Job!! Well done Liz!

Carol xxx

Monday, 16 May 2011

May Moodboard

Welcome to this week's Moodboard update!

Dee created this gorgeous bracelet using a ceramic button...


Mandy has made this fabulous Pom-Pom Bead using a pattern by Nancy Zellers from "The Art of Beaded Beads" book...


And would you believe that Carol and I made the same design?! Here is Carol's version...


And here's mine, the design is from my own Starlet tutorial...


If you want to join in with us this month and show us your green side, please see the original post for details.

Sunday, 15 May 2011

Sunday is Beady Fun Day.

Hiya,

You may have noticed that there was no free pattern yesterday! My tutorial mojo seems to have gone on a bit of a holiday, I think maybe that posting one each week is a bit too much and doesn't give me enough time to try experimenting with new ideas, so I thought I would try alternating Saturday tutorials with a Sunday post about interesting beady things on the web. Well, we'll try it and see how it goes, comments/suggestions are always welcome!

I have been very busy lately and haven't had much time to see what's up in the beady Internet world, so I think this is going to be fun! At this time of year, I see lots of posts about various contests and competitions but either miss out on the deadlines or just don't have the time to complete a big piece, so I thought I'd have a little look around for some information on contests to share with you all,

First of all I found this great post by Mandi at Bead Circle Network on the reasons to enter a beading contest, http://beadcircle.com/2011/01/7-reasons-to-enter-a-beading-contest/

Next I found the Fashion Colourworks Beading Contest 2011 run by Zoya Gutina at My Lovely Beads. This contest is based on Pantone colour palettes, there are 3 to choose from and there are 3 categories so you could enter up to 9 pieces if you wanted! The deadline for this contest is June 15th. It looks like a good one, you can read the full set of rules here;
http://www.mylovelybeads.com/contest/2011/rules.php

Last but not least, OTTBS reader Dee recently entered the Urban Beautiful Contest with her stunning necklace London City Reflections and my twitter friend Hollybirdbeads fabulous Flora Metallica is also an entry. There are 16 pages of beautiful creations, so I would definitely encourage you to go have a look! http://www.urbanbeautiful.com/en/design-gallery/popular/?page=8

Happy beading!

Sarahx

Wednesday, 11 May 2011

Website Review - Ruby's Beadwork

Hello!

Many apologies for not posting a review last week, a combination of changing roles at work and the Bank Holiday weekend made me very absent minded! I have got a quick link and review of an old favourite website this week, some of you may already be aware of it but I thought it well worth a mention for any readers who are just starting out with beadweaving. Many years ago when I first came across beading as a hobby I joined the about.com beading forum where I found a lot of useful information and helpful advice. There was a lovely lady on there called Ruby, who was very active in encouraging new beaders and posting lovely free patterns. I haven't visited her website for a long time, but yesterday I was asked to run a taster beading session at my offices Adult Learner Day, so I have been thinking about how I started out and I was once again reminded of it.

http://www.rubysbeadwork.com/Thumbnails.html

There are over 50 patterns/tutorials on this website, including necklaces, bracelets, rings and a range of techniques from making your own jump rings, bails and clasps in wirework to off loom beadweaving. The favourite project that I remember making when I very first started out is The Terri choker http://www.rubysbeadwork.com/TerriChoker.html which is a lovely necklace using size 8 beads and fire polish beads, it's a simple project easily achieved by an adventurous beginner (trust me, if i could do it back then, anyone can!) and is particularly good for a prom style necklace, I think. Finishing this project really motivated me to try different techniques. I also learnt spiral rope and netting stitch from this website and the flat netted bracelet http://www.rubysbeadwork.com/CuffBracelet.html was a favourite for a long time, I have embellished in many ways, with fringing along both sides, lengthened it as a choker and added Russian leaves to it, the possibilities are endless!

Looking at the website today, there are still some projects that I would like to try, especially the Medallion Ornament http://www.rubysbeadwork.com/MedallionOrnament.html

So if you are just starting out in beadweaving, or just fancy a quick and easy project, you should definitely check out this site!

Happy beading!

Sarahx

Monday, 9 May 2011

May Moodboard

Our first submission to the May moodboard is this gorgeous piece of glasswork from Debbie!


If you'd like to join in with us this month then please see the original post for details.