Showing posts with label brick stitch. Show all posts

Tuesday, 8 July 2014

Basic Stitch Tutorial - Brick Stitch

It's been some time since we had a Basic Stitch post so here we are with a brick stitch tutorial! In brick stitch, each bead is offset from the beads below, rather like a brick in a wall (hence the name). You can use any size bead for this stitch but you'll want to use beads that are fairly regular in size, to keep a straight line, and any of the Japanese seed beads are great for this. I'm using Toho size 11 seed beads here.

Start off with a ladder stitch base. If you're not familiar with ladder stitch we have a tutorial for you here. If you'd prefer a thicker base to hold onto you can always make a two bead stack. I've made a one bead stack here. The length can be any number of beads but you'll want your thread to be coming out of the top of the last bead.

Pick up 2 seed beads and pass the needle under the thread that connects the two end beads on the ladder stitch base...


...and sew up through the last bead added. Pull the thread taut so that the two beads sit neatly side by side.


Now pick up 1 seed bead and pass the needle underneath the next thread. These connecting threads are also known as 'bridges' so that's what I'll refer to them from here on.


Sew up through the bead you just added...


Repeat the above step, adding 1 bead at a time, until you reach the end of the base and have no more bridges left.

To make this end of the brick stitch identical to the other you will have to add one more bead so pick up 1 bead and pass the needle under the same bridge that you just used and sew back up through the bead as before.


And that is your basic brick stitch!

Now there is the subject of increasing and decreasing with this stitch which you'll need to learn in order to complete a pattern. Depending on the pattern you have two choices on how to start and end your rows. 

If you start as I did at the beginning, by adding 2 beads onto the first bridge this will increase the edge by 1 bead...


If you keep doing this you'll have a diagonal shaped edge which you can see starting in the photo below...


But what if you don't need a diagonal edge? Easy! You pick up your 2 beads as usual but skip the first thread bridge and pass the needle under the second....


...and back up through the second bead...


But ugh, now my beads are wonky! Never mind, there's a trick for this. Sew down through the first bead...


...then up through the second bead...


And ooh look, nice neat beads! I do like it when my beads line up lol, but I guess you could skip this bit if you're not bothered ;)


Now when you get to the end of this row you can either stop at the last thread bridge to decrease the edge or add another bead to it if you need to increase the edge. 

Tips: You can use two or more beads to give your beadwork extra height, remember to pick up double at the start of your row. So if you use two beads per stitch then pick up four to start.

Notice how brick stitch looks exactly like peyote stitch when you rotate it? This means that you can use any peyote pattern for brick stitch (and vice versa), you just need to turn the pattern on it's side!

Here are some examples of finished brick stitch projects, all made by our very own Carol Passaro.


Carol's own design


Adapted from a pattern by Rita Sova


 Holly pattern by Threadabead


 Poppy by Kerrie Slade

Saturday, 15 October 2011

Day & Night Earring Reveal 1!

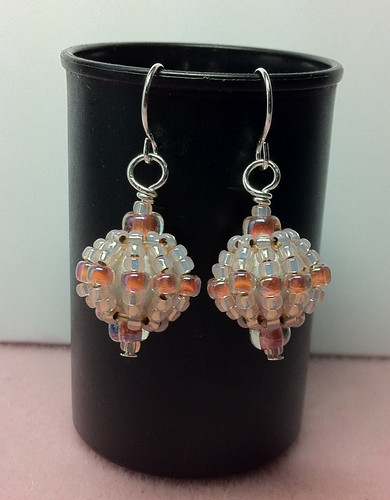
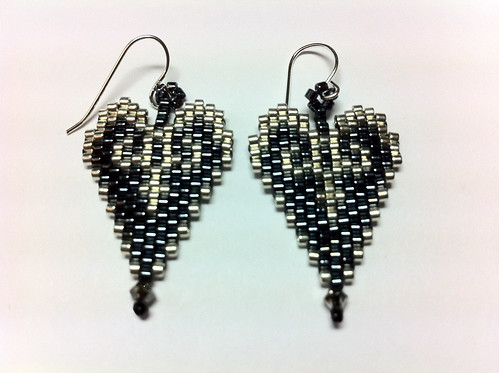
I am excited to share our 1st earring swap reveal with you! Carol was very quick off the ball with these beautiful earrings that she has made for Rebecca. I am a big fan of the spinning top beaded beads by Bead Infinitum and the heart earrings are so elegant for the evening!

Day
Spinning Top Beaded Bead Earrings OTTBS Swap

Night
Heart Evening Earrings OTTBS Earring Swap

Happy beading!

Sarahx

Saturday, 26 March 2011

Free Pattern - Double Negative Brick Stitch Earrings.

Hey gang, hope you have all been enjoying the beautiful sunshine we have had this week! I'm not sure that this pattern is very seasonal but it is striking! I am a big fan of black and white, maybe with a touch of red and I hope you like this double negative brick stitch earring pattern.


Happy beading!
Sarahx

Saturday, 26 February 2011

Free Pattern - Triple Diamond Brick Stitch Earrings

You have probably already noticed that I quite like very long earrings. It's an inherited taste from my grandma who always wore what she called Gypsy Rose Lee style earrings. This weeks pattern is inspired by the colours in our February moodboard challenge but feel free to use whatever combinations you like. I'd love to see them if you make a pair! Happy beading!

Sarahx

Saturday, 12 February 2011

Hey Cupcakes! Free brick stitch cupcake pattern.

I may not be a romantic but I do have a sweet tooth! Here is a sweet cupcake pattern to help you use up your seed bead/delica stash up. It would make a lovely brooch as a gift for a keen baker or cake eater! Happy beading!

Sarahx


Saturday, 5 February 2011

Valentine Heart Free Brick stitch Pattern.

With only 9 days to go to Valentines Day, I thought it would be a good time to share this brick stitch heart pattern that I designed a while ago. It would make a great pendant, brooch or you could bead a few and link them up into a necklace or a bracelet. I designed it using delica's but you could just as easily use size 11 japanese seed beads.

I hope you like it!
Sarahx

Wednesday, 2 June 2010

Final May Goal Was A Bust!


I set myself the task of making 5 beadwoven pendants from my 3 boxes of delica's. I knew it wouls be hard but it was an impossible task for me last week! I did manage 2 pendants though, a butterfly and a heart.

Monday, 24 May 2010

5th May Goal Complete - Sarah

I have quite a stash of delica beads that I haven't used in some time and some of them haven't even been opened. Well, we can't have that now can we? Making my Blue Jeans Butterfly for my Folksy summer swap partner reminded me how fabulous they are to work with, so I'm now on a mission to make 5 more beaded pendants with delica's by the end of this month. Yes, that's a lot but I figure I might as well aim high!

While routing through my 3 takeaway containers of delica's (they aren't all completely full, honest, I sort by colour. Of course we aren't mentioning the ones packed away upstairs, out of sight and all that), I came across this pretty mix that I bought in a frenzy when I realised that Hobbycraft in my town sold them. I wanted to take some photo's for the post below and thought these would make a pretty butterfly.
I am doing a craft fair on Saturday and wanted some more butterflies to take with me, I'd like a little grouping of them on my display. So here she is, I think she's pretty but needs some brighter friends to sit alongside her on my table. Watch this space....


An Attempt to Explain How I Construct a Butterfly.

Clair asked how I construct my butterfly pendant, so I thought I would put together a quick and dirty explanation. I have got a lot on and don't really have time for anything more detailed at the moment.

First of all you will need 4 equally sized brick stitch diamonds, here's a link to a tutorial if you want one, http://www.beadwrangler.com/samplers/brickstitch2/making_brickstitch_samples2.html

Then lay them out in pairs with 1 edge of each diamond flush against the other.


Thread a needle through one of the tails and go down through the 1st edge bead of diamond 1, then up through the 1st edge bead of diamond 2 and back down the 1st edge bead of diamond 1, continue like this until you have the 2 edges sewn together.


Repeat for the other pair of diamonds. Then lay 2 of the bottom edges of each pair together and attach as above. Clear as mud? Hope these pics help!


Monday, 17 May 2010

1st May Goal Picture & The Promise of Things to Come - Sarah

You'll note that I titled this post the 1st picture of May and not just the 1st completed goal. That's because I have been feverishly beading birthday presents and swap gifts which are all super-secret and it's been really hard to note post here and show you what I've made and used from my stash!

This is my most recent stash busting project, I have a hoard of delica beads that I have not used for ages and I thought it was about time that I did, they are far too beautiful to languish in my bead box, only o be taken out to be admired on occasion. I have been on a nature kick lately and started making tiny butterfly pendants in 1 colour of size 11's but thought how pretty several shades would be. I also had a few problems with the holes of the 11's filling with thread, so the delica's are perfect for this project. So here I have a beautiful pendant which I have called Blue Jeans Butterfly to remind me that Summer is just around the corner.

The birthday gifts are being delivered tomorrow, so I can update you on them then.

Monday, 12 April 2010

1st April Goal Completed(ish).


You may notice that my bracelet does not have the ruffles of the retro ruffles cuff. I was merrily brickstitching away for hours and hours and while I loved the project I realised that I have a few commitments that I need to get on with; a necklace for a forum swap, some little gifts for giveaway prizes at the next Vintage Pretty Fayre and 2 birthday gifts, as well as working out some new designs for April is Forever. So instead of putting it away, as I knew it would never get finished I simply added a row of picots on the edge and called it done. I still like it and will probably make the full version at a later date as the instructions for this are so good. I particularly like this style of fastening and will be experimenting with it in other designs.

Monday, 5 April 2010

New Goal For April


I trawled through all my mags and books late last night and decided on the cover project of Beadwork Feb/Mar 10. The project is called Retro Ruffles Cuff by Rachel Nelson-Smith. I started while watching the new Doctor Who and managed to do the ladder stitch base. I didn't have button in my stash and instead used a lovely 14mm rondelle. I have done quite a bit more of it today, it is going well, mainly because I am using single thread I think. The instructions do state double but as I learnt on my last piece, that just doesn't work for me!

Sunday, 4 April 2010

1st Goal Complete (Liz)

Happy Easter to you all! Well I am pleased to say that I've completed my first goal and, even if I do say so myself, ended up with a lovely cuff for my sister! The design is a new tutorial from Lynn Davy which I thought would be perfect for using up some of the bugle beads I have and never use. I still have loads of those Navy Iris 15s left but I was happy to use some of them at last plus half a pack of twisted bugle beads, the rest of a pack of purple size 11s, some metallic silver beads and these gorgeous black and purple AB faceted beads that I seem to have had forever! I hope you like it.