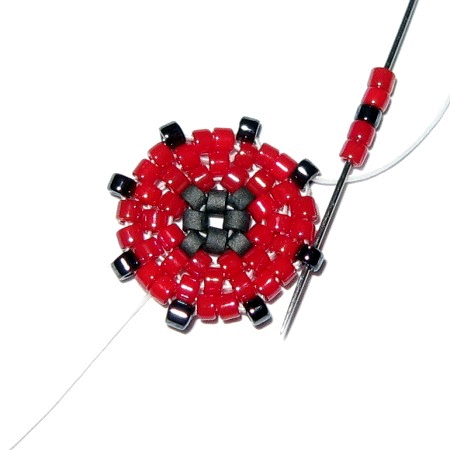
- A small amount of cylinder beads in colours A (centre colour), B (main colour) and C (accent colour).
- A size 10/12 beading needle threaded with about half a metre of beading thread.
- Pair of earwires
- 2 x 4mm jump rings, thin enough to go through a cylinder bead.
- Pliers
Tuesday, 8 April 2014
Tutorial - Starburst Earrings
Saturday, 12 October 2013
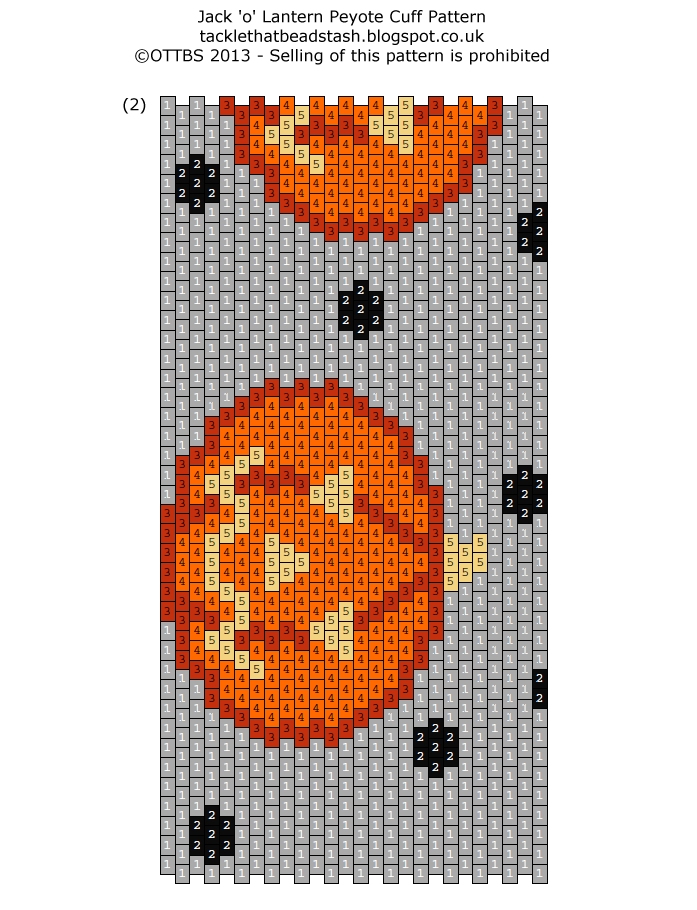
Free Jack 'o' Lantern Cuff Pattern
Thursday, 27 October 2011
Pattern Finds - Perfect Evening Earrings
As always, click on the pic to be taken to the listing.
Happy Beading!
Sarahx
Wednesday, 27 July 2011
Pattern Finds - Fringed Beaded Bead by Jade Dog Beads
Link to Darcy's shop http://www.etsy.com/shop/JadeDogBeads?ref=seller_info
I hope you like it as much as I do! I think it will make a fabulous summer accessory,the difficulty will be be in deciding what colour to make first!
Happy Beading!
Sarahx
Saturday, 18 June 2011
Stashbusting Project Idea - Bead Soup Rings.
The pink, cream and gold ring was the 1st I made and has just the 3 colours, but still works out quite nicely. The proportions can be tricky, don't use the same amounts for all colours, I found this looked a little odd and not random enough. The purple ring has 6 different shades and finishes. The brown button ring has brown as the main colour in the mix with beige and 2 different shades of gold.
I found that having one shade as the main colour (at least 50% of the finished mix) worked well and then add different amounts of related colours in different shades and finishes. One of my most successful mixes was a blue one with 6 closely related shades of teal and blue, each one a different finish, it stitched up really nicely too.
Once I had my mix I then stitched up the rings using 2 drop peyote stitch, these are 12 beads wide. I then zipped them up and added a focal.
Great little stashbusters and I think if you made them wider and longer, they would make great napkin rings!
Happy beading,
Sarahx
Saturday, 30 April 2011
Free Pattern - Diamond Lines Peyote Bracelet
Saturday, 2 April 2011
Basic Stitch Tutorial - Peyote
Welcome to the first of our basic stitch tutorials! In this series of tutorials we'll be showing you the basics of different stitches and techniques, building up a collection of tutorials that you can refer to whenever you need them. Because you can do so much with the basic stitches once you've learnt them we won’t be including instructions for finishing or embellishing.
We’re beginning the series with peyote stitch, a very versatile technique which is well worth adding to any beaders repertoire. In this tutorial I’m using size 8 Japanese seed beads to create a strip of peyote 6 beads wide. This is a quick and easy way to learn peyote as you only need to add 3 beads per row and the bead size means it works up quickly. I’m also using C-lon beading thread and a size 10 beading needle.
Before you start, thread your needle with a comfortable length of thread. Pick up a stop bead, move it down to about 8" from the end of the thread and sew through it again in the same direction, being careful not to split the thread. The stop bead is a single bead in a contrast colour, it stops your beads falling off and helps you to achieve a better tension when you work the first few rows.
You may find it easier to work the first few rows on a flat surface.
Pick up 6 beads and slide them down to the stop bead.
Pick up 1 bead, skip the first bead on the row and sew through the second bead.
Pick up 1 bead, skip a bead on the row and sew through the next bead.
Pick up 1 bead, skip a bead and sew through the final bead to complete the row. Pull the thread taut to line up the beads.
You’ve just completed 3 rows of peyote (the 6 beads you picked up at the start count as rows 1 and 2) and now have a small strip that has ‘up beads’.
Onto row 4...
Pick up 1 bead and sew through the first ‘up bead’.
Pick up 1 bead and sew through the second ‘up bead’.
Pick up 1 bead and sew through the final ‘up bead’.
Continue picking up 1 bead and sewing through the ‘up beads’, adding 3 beads per row until the strip is as long as you need. You can change the direction that you sew or you might find it easier to flip the strip over after every row. Make sure you keep the thread taut as you work.![]()
Here’s a bracelet I made with the above instructions, using a 'Salt & Pepper' Miyuki bead mix.
I hope you've enjoyed this tutorial, if you have any questions then please ask away!
Friday, 4 March 2011
Giveaway Prize - Sneaky Peak 3
Happy beading!
Sarahx
Saturday, 19 February 2011
Free Pattern - Blue Waves Peyote Bracelet
This Valentines day the husbeast treated to me to a trip to Cardiff, which is always dangerous for my stash busting plans as the lovely bead shop Crystals and Ice is there. True to form I bought quite a lot of seed beads though I did restrain myself and stay away from the delica's! I bought some blue's, forgetting that I already had a plastic carton full of them)and wanted a simple pattern to use some of them up. I came up with this and thought that I would share it with our lovely OTTBS readers as I bet I'm not the only one with masses of seed beads in blue! I think it would look good in lots of other combinations too, I may try a black and red version at some point.The dimensions using size 11 miyuki seed beads are width 1.31 inches, length 6.47 inches, just add or detract rows to resize. The bracelet uses the odd count peyote technique, if you aren't familiar with this or need a refresher, here is a link to a tutorial on about.com http://beadwork.about.com/od/beadingstitchtutorials/ss/Flat_odd_Count_Peyote.htm
Happy beading!
Sarahx
Thursday, 8 July 2010
The Trials & Tribulations of Goal 8!
First of all, huge apologies for my lack of posting lately. I've been really busy with orders and commissions (although I'm not complaining!) plus other non-beady stuff and have spread myself a little too thin.
Also I came to a total standstill with my last goal. I had planned to use up that gorgeous tube of beads by the end of the week but three weeks later they were still sitting on my desk! Several times I had an idea, tipped the beads onto my bead mat and had a go but everything I tried was a disaster.
I discovered that they're not very good for herringbone, triangle stitch or right-angle weave. I had an idea that because they're triangles, they would look good stitched in rows on a bead embroidered cuff and I visualised a lovely zig-zag texture. No. They wobbled about a bit and it just looked messy, so back into the tube they went.
My last resort was peyote stitch which I had dismissed at first because of their shape. Success! They fit together brilliantly to give an unusual effect. So off I went, merrily making a six bead wide strip to make a bracelet...and ran out of beads three quarters of the way through! Grr. Determined not to buy another tube of these flippin' beads I unpicked it all and started again with four beads. Several hours later and with the addition of some red and gold seed beads I had this bracelet...

Now who was it that said beading was relaxing, lol.
Thursday, 22 April 2010
2nd April Goal Completed -Sarah

I dug out a bag of hex beads and half a tube of matte frosted (one of my fave finishes) size 11's out of my stash late last week and was determined to bead until I had used them all up. I made strips of peyote which I zipped up and strung with strands between. I haven't explained that very well have I? I have a fair on Saturday so I am busy but after that I'll make another and take photo's and do some instructions because this was a really good stashbusting project! You can just keep going until all your beads have going, it's fun too. I actually counted and I had 5 seed beads left and 3 culls from the hex beads, result!
Sunday, 4 April 2010
1st Goal Complete (Liz)
Happy Easter to you all! Well I am pleased to say that I've completed my first goal and, even if I do say so myself, ended up with a lovely cuff for my sister! The design is a new tutorial from Lynn Davy which I thought would be perfect for using up some of the bugle beads I have and never use. I still have loads of those Navy Iris 15s left but I was happy to use some of them at last plus half a pack of twisted bugle beads, the rest of a pack of purple size 11s, some metallic silver beads and these gorgeous black and purple AB faceted beads that I seem to have had forever! I hope you like it.
Thursday, 11 March 2010
Some helpful links...
This is one for the African Helix Stitch
This one is for free Delica patterns
This one is for Jewelry Making and Beading Projects
This one is from Bead and Button Magazine for Free Projects
Here's one for a Square Stitch Rosette Beaded Ornament
This one is for a Beaded Icicle
This is for Free Patterns
Here's one for a Bracelet with Paua Shell Cabochon and Seed Beads
Free patterns from A to Z
More free beading patterns
Free Peyote Patterns
Even more free Beading Patterns
Here's one for a beautiful Necklace
Bead Tree Tutorial
This one is for Bead Crochet
Here's many different Tutorials
Here's one for a beading glossary
I hope that these links will be helpful to you in using your bead stash up and making beautiful beaded pieces!
So until next time please don't forget, "Operation Tackle that Bead Stash" and Bead Happy!
Hugs and happy beading...
Bobbi